(RSS2021)GIGA

​ 第一次看别的组的GraspNet,最吸引我的是这篇文章有开源基于Pybullet的仿真器采集数据的部分,代码算是给了我很大的启发。不过随之而来的可能就是真的要重构我目前的仿真器部分……好在工程量并不算大,并且比起我现有的仿真器实现,性能会有巨大的提升。

仿真器部分

​ 为了省去看完论文后又要重新看一遍代码的苦恼,我先从我最关注的仿真器实现部分说起。这篇论文主打的就是3D重建和基于点云几何的Grasp Proposal的联合训练。数据采集部分,其实就是从点云中选取点和对应的法向量,并且均匀从$[0,\text{gripper_length}]$中采集一个接近距离,并且去实现抓取。不过,比起我类似操作的NaÏve实现,我觉得他们的实现有几个优点:

  • 仅加载夹爪模型,省去了机械臂整体的IK和planning的复杂性。这一点其实6D-GraspNet也是这么做的,只是我限于当时的见解和关注的方向,一直忽略了这一点事实,导致有很长一段时间一直在关注IK和planning去做collision-free的整机避障。

  • 代码轻量级,由于省去了IK和Planning,只需要一个循环即可完成数据的创建。并且可以很容易地做多进程。

  • 提前剪枝,对于Grasp非法的collision情况,会提前通过仿真器的接触点API判断做continue,这样的话可以无需每个仿真都执行到最后。

​ 这也引起了我的反思,确实应当广泛地从他人的代码中吸取方法论、代码结构、抽象上的经验,相对于把想法落到实处,想法对不对、高不高效可能更加重要。

​ 我们先来看最主要的这个循环,其实做的事情也很简单,随机加载一个场景,拍很多张深度图恢复点云。然后随机采样Grasp Proposal执行,看看是成功还是失败。

1
2
3
4
5
6
7
8
9
10
11
12
13
14
15
16
17
18
19
20
21
22
23
24
25
26
27
28
29
30
31
32
33
34
35
36
37
38
for _ in range(grasps_per_worker // GRASPS_PER_SCENE):  # how many scene need to create
# generate heap
object_count = np.random.poisson(OBJECT_COUNT_LAMBDA) + 1
sim.reset(object_count) # generate the table and piled or packed objects
sim.save_state()

# render synthetic depth images
n = MAX_VIEWPOINT_COUNT
depth_imgs, extrinsics = render_images(sim, n)
depth_imgs_side, extrinsics_side = render_side_images(sim, 1, args.random)

# reconstrct point cloud using a subset of the images
tsdf = create_tsdf(sim.size, 120, depth_imgs, sim.camera.intrinsic, extrinsics)
pc = tsdf.get_cloud()

# crop surface and borders from point cloud
bounding_box = o3d.geometry.AxisAlignedBoundingBox(sim.lower, sim.upper)
pc = pc.crop(bounding_box)
# o3d.visualization.draw_geometries([pc])

if pc.is_empty():
print("Point cloud empty, skipping scene")
continue

# store the raw data
scene_id = write_sensor_data(args.root, depth_imgs_side, extrinsics_side)
if args.save_scene:
mesh_pose_list = get_mesh_pose_list_from_world(sim.world, args.object_set)
write_point_cloud(args.root, scene_id, mesh_pose_list, name="mesh_pose_list")

for _ in range(GRASPS_PER_SCENE):
# sample and evaluate a grasp point
point, normal = sample_grasp_point(pc, finger_depth)
grasp, label = evaluate_grasp_point(sim, point, normal)

# store the sample
write_grasp(args.root, scene_id, grasp, label)
pbar.update()

​ 这个循环还是简单易懂的,我们接下来主要看看两个关键函数sample_grasp_point和evaluate_grasp_point。

1
2
3
4
5
6
7
8
9
10
11
12
13
14
15
16
17
18
19
20
21
22
23
24
25
26
27
28
29
30
31
32
33
34
35
36
37
38
39
40
41
42
43
44
45
46
47
48
49
50
def sample_grasp_point(point_cloud, finger_depth, eps=0.1):
# this function helps to sample grasp proposals from the raw observed point cloud
points = np.asarray(point_cloud.points)
normals = np.asarray(point_cloud.normals)
ok = False
while not ok:
# TODO this could result in an infinite loop, though very unlikely
idx = np.random.randint(len(points))
point, normal = points[idx], normals[idx]
ok = normal[2] > -0.1 # make sure the normal is poitning upwards
grasp_depth = np.random.uniform(-eps * finger_depth, (1.0 + eps) * finger_depth)
point = point + normal * grasp_depth
return point, normal


def evaluate_grasp_point(sim, pos, normal, num_rotations=6):
# define initial grasp frame on object surface
z_axis = -normal
x_axis = np.r_[1.0, 0.0, 0.0]
if np.isclose(np.abs(np.dot(x_axis, z_axis)), 1.0, 1e-4):
x_axis = np.r_[0.0, 1.0, 0.0]
y_axis = np.cross(z_axis, x_axis)
x_axis = np.cross(y_axis, z_axis)
R = Rotation.from_matrix(np.vstack((x_axis, y_axis, z_axis)).T)

# 在确定了pos和normal后,其实就只需要采样normal内的一个自由度的旋转角度即可,可以参考GraspNet-1Billion的叙述

# try to grasp with different yaw angles
yaws = np.linspace(0.0, np.pi, num_rotations)
outcomes, widths = [], []
for yaw in yaws:
ori = R * Rotation.from_euler("z", yaw)
sim.restore_state()
candidate = Grasp(Transform(ori, pos), width=sim.gripper.max_opening_width)
outcome, width = sim.execute_grasp(candidate, remove=False)
outcomes.append(outcome)
widths.append(width)

# detect mid-point of widest peak of successful yaw angles
# TODO currently this does not properly handle periodicity
successes = (np.asarray(outcomes) == Label.SUCCESS).astype(float)
if np.sum(successes):
peaks, properties = signal.find_peaks(
x=np.r_[0, successes, 0], height=1, width=1
)
idx_of_widest_peak = peaks[np.argmax(properties["widths"])] - 1
ori = R * Rotation.from_euler("z", yaws[idx_of_widest_peak])
width = widths[idx_of_widest_peak]

return Grasp(Transform(ori, pos), width), int(np.max(outcomes))

​ 上面是一个对Grasp的评估函数,里面最主要的是sim.execute_grasp(candidate, remove=False)。

1
2
3
4
5
6
7
8
9
10
11
12
13
14
15
16
17
18
19
20
21
22
23
24
25
26
27
28
29
30
31
32
33
34
35
36
37
38
39
40
41
42
43
44
def execute_grasp(self, grasp, remove=True, allow_contact=False):
T_world_grasp = grasp.pose
T_grasp_pregrasp = Transform(Rotation.identity(), [0.0, 0.0, -0.05])
T_world_pregrasp = T_world_grasp * T_grasp_pregrasp

approach = T_world_grasp.rotation.as_matrix()[:, 2]
angle = np.arccos(np.dot(approach, np.r_[0.0, 0.0, -1.0]))
if angle > np.pi / 3.0:
# side grasp, lift the object after establishing a grasp
# 对于Grasp的渐进轴过于倾斜的,抓住以后不再沿着轴运动,而是往上提
T_grasp_pregrasp_world = Transform(Rotation.identity(), [0.0, 0.0, 0.1])
T_world_retreat = T_grasp_pregrasp_world * T_world_grasp
else:
T_grasp_retreat = Transform(Rotation.identity(), [0.0, 0.0, -0.1])
T_world_retreat = T_world_grasp * T_grasp_retreat

self.gripper.reset(T_world_pregrasp)

# 如果把夹爪放到预接近位置都有碰撞了,那么就立马结束
if self.gripper.detect_contact():
result = Label.FAILURE, self.gripper.max_opening_width
else:
self.gripper.move_tcp_xyz(T_world_grasp, abort_on_contact=True)
# gripper运动到指定位置 或者 碰到了东西
if self.gripper.detect_contact() and not allow_contact:
result = Label.FAILURE, self.gripper.max_opening_width
else:
self.gripper.move(0.0) # 合上夹爪
self.gripper.move_tcp_xyz(T_world_retreat, abort_on_contact=False)
# 夹爪抓着东西回退
if self.check_success(self.gripper):
result = Label.SUCCESS, self.gripper.read()
if remove:
contacts = self.world.get_contacts(self.gripper.body)
self.world.remove_body(contacts[0].bodyB)
else:
result = Label.FAILURE, self.gripper.max_opening_width

self.world.remove_body(self.gripper.body)

if remove:
self.remove_and_wait()

return result

​ 我们再来看gripper的封装。注意到命名中的TCP其实是tool center point的意思。

1
2
3
4
5
6
7
8
9
10
11
12
13
14
15
16
17
18
19
20
21
22
23
24
25
26
27
28
29
30
31
32
33
34
35
36
37
38
39
40
41
42
43
44
45
46
47
48
49
50
51
52
53
54
55
56
57
58
59
60
61
62
63
64
65
66
67
68
69
70
71
72
73
74
75
76
77
78
79
80
81
82
83
84
85
86
87
88
89
90
91
class Gripper(object):
"""Simulated Panda hand."""

def __init__(self, world):
self.world = world
self.urdf_path = Path("../data/urdfs/panda/hand.urdf")

self.max_opening_width = 0.08
self.finger_depth = 0.05
self.T_body_tcp = Transform(Rotation.identity(), [0.0, 0.0, 0.022])
self.T_tcp_body = self.T_body_tcp.inverse()

def reset(self, T_world_tcp):
T_world_body = T_world_tcp * self.T_tcp_body
self.body = self.world.load_urdf(self.urdf_path, T_world_body)
self.body.set_pose(T_world_body) # sets the position of the COM, not URDF link
self.constraint = self.world.add_constraint(
self.body,
None,
None,
None,
pybullet.JOINT_FIXED,
[0.0, 0.0, 0.0],
Transform.identity(),
T_world_body,
)
self.update_tcp_constraint(T_world_tcp)
# constraint to keep fingers centered
self.world.add_constraint(
self.body,
self.body.links["panda_leftfinger"],
self.body,
self.body.links["panda_rightfinger"],
pybullet.JOINT_GEAR,
[1.0, 0.0, 0.0],
Transform.identity(),
).change(gearRatio=-1, erp=0.1, maxForce=50)
self.joint1 = self.body.joints["panda_finger_joint1"]
self.joint1.set_position(0.5 * self.max_opening_width, kinematics=True)
self.joint2 = self.body.joints["panda_finger_joint2"]
self.joint2.set_position(0.5 * self.max_opening_width, kinematics=True)

def update_tcp_constraint(self, T_world_tcp):
# 其实就是以300N的力去施加在夹爪上,使它移动到对应的位置
T_world_body = T_world_tcp * self.T_tcp_body
self.constraint.change(
jointChildPivot=T_world_body.translation,
jointChildFrameOrientation=T_world_body.rotation.as_quat(),
maxForce=300,
)

def set_tcp(self, T_world_tcp):
T_word_body = T_world_tcp * self.T_tcp_body
self.body.set_pose(T_word_body)
self.update_tcp_constraint(T_world_tcp)

def move_tcp_xyz(self, target, eef_step=0.002, vel=0.10, abort_on_contact=True):
# 一个类似于ik的作用
T_world_body = self.body.get_pose()
T_world_tcp = T_world_body * self.T_body_tcp

diff = target.translation - T_world_tcp.translation
n_steps = int(np.linalg.norm(diff) / eef_step)
dist_step = diff / n_steps
dur_step = np.linalg.norm(dist_step) / vel

for _ in range(n_steps):
T_world_tcp.translation += dist_step
self.update_tcp_constraint(T_world_tcp)
for _ in range(int(dur_step / self.world.dt)):
self.world.step()
if abort_on_contact and self.detect_contact(): # 检测到了碰撞的情况下,根据设置直接返回或继续
return

def detect_contact(self, threshold=5): # 通过pybullet的API做碰撞检测
if self.world.get_contacts(self.body):
return True
else:
return False

def move(self, width): # 开合夹爪
self.joint1.set_position(0.5 * width)
self.joint2.set_position(0.5 * width)
for _ in range(int(0.5 / self.world.dt)):
self.world.step()

def read(self):
width = self.joint1.get_position() + self.joint2.get_position()
return width

[CVPR2019] Occupancy Networks

​ 为了理解GIGA整篇论文在做什么,我先尝试理解它主打的Occupancy Networks。这是3D重建领域的一篇工作。目标是使用3D的决策边界来描述任意精度的3D几何模型。

​ 现有的表示方式如上图所示,前三者都是离散表示。但是如果使用决策边界这种表示方法的话,那就是连续表示了。我们可以通过后续介绍的采样算法采出任意精度来。

​ 具体来说,我们的物体模型通过occupancy function $o:R^3\rightarrow{0,1}$来描述,因为定义域是连续的$R^3$空间,首先不存在分辨率的问题。1就代表这个地方存在物体,而0就代表这个地方没有物体。

​ 我们希望通过神经网络去拟合这样一个函数,这就是一个二分类的问题。而在3D重建的场景中,我们需要通过物体的观测$\chi$(图片、点云等)去恢复这个占用函数$R^3\rightarrow{0, 1}$,我们可以等价地转换为输入一个观测$\chi$和查询的点$p$,查询这个点的占用概率(0~1)。

​ 即我们的occupancy network就是用来拟合函数$f_{\theta}:R^3\times \chi\rightarrow{0,1}$的。而最终训练出来的概率分布,我们可以简单地通过一个阈值$\tau$来约束它的边界在哪里。这样,最终的模型就是$f_{\theta} = \tau$就是物体模型的表面。

​ 正如博客所说,大道至简,这篇工作的目的就是把2D图片的矢量图这个概念扩展到的3D模型上。用连续的占用函数去刻画一个模型,非常巧妙也非常直观。可以通过这个视频直观地感受一下。

​ 这个视频最后的部分是训练的VAE在隐变量空间上连续采样得到的效果,非常惊艳。

Training

​ 如果理解了这篇论文的独创性,训练其实就没什么好说的了,无非就是对于每个batch,采样然后对occupancy function的预测做交叉熵。
$$
L_B(\theta)=\frac{1}{|B|}\sum^{|B|}_{i=1}\sum^K_{j=1}L(f_{\theta}(p_{ij},x_{i}),o_{ij})
$$
VAE的Loss类似,加上KL散度即可。
$$
L_B^{gen}(\theta,\psi)=\frac{1}{|B|}\sum^{|B|}_{i=1}\left[\sum^K_{j=1}L(f_{\theta}(p_{ij},x_{i}),o_{ij})+KL(q_{\psi}(z|(p_{ij},o_{ij})_{j=1:K})||p_0(z))\right]
$$

通过占用函数还原网格

image-20220126224338282

​ 具体算法不再细究,我认为这是一个类似于碰撞检测中的KD-Tree的变分辨率采样。

[ECCV2020] Convolutional Occupancy Network

网站,先放作者讲解视频,有空再补。

​ 暂略。

Return back to GIGA

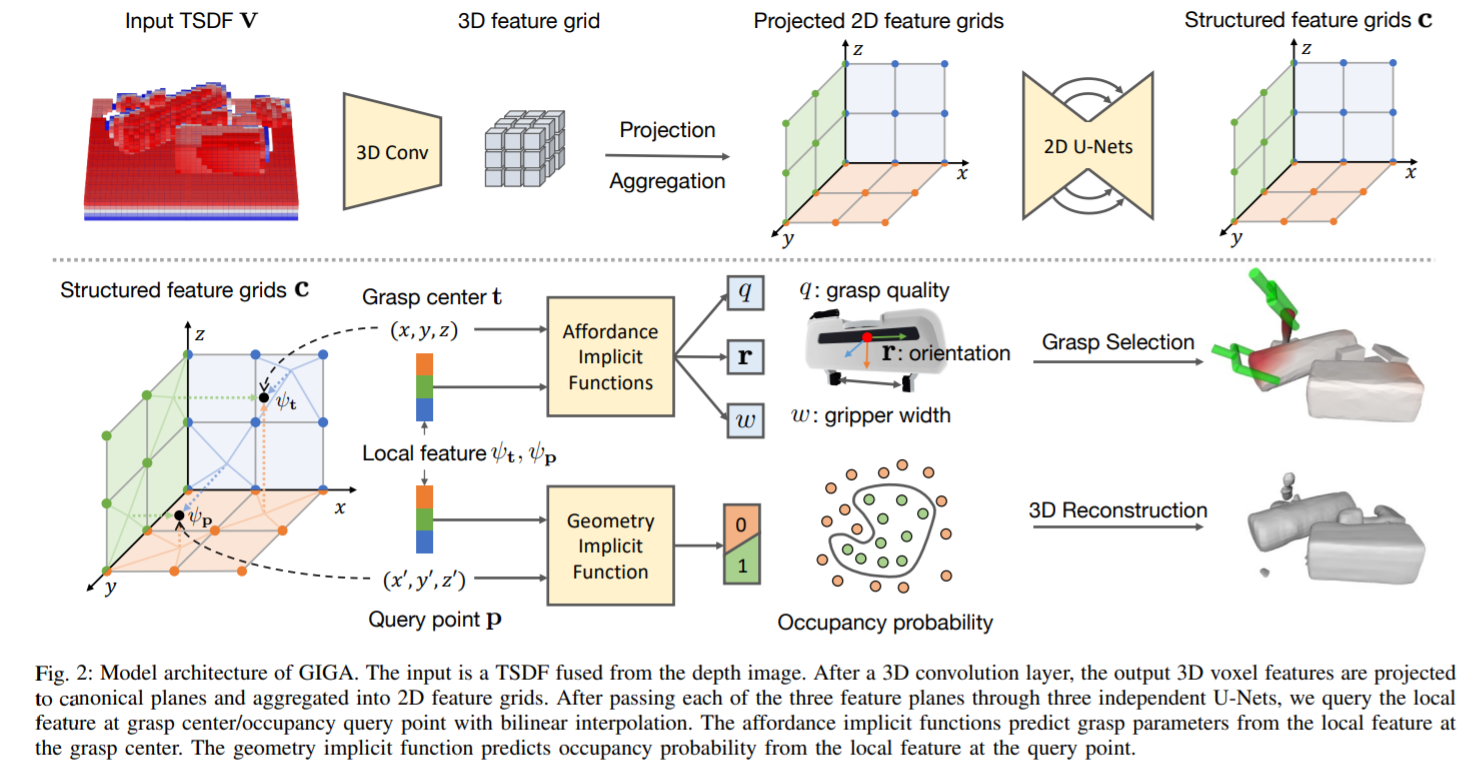
​ 这张图就是GIGA的结构,输入的V其实可以理解为voxel representation of point cloud。经过3D卷积得到特征网格,投影其实是为了降维,因为3D CNN的计算存储开销都太大了。降维以后我们得到3个特征平面,在原文中使用的是canonical feature plane,我还以为和什么PCA相关,其实它就是往坐标轴对应的三个平面上投影了。然后在这个特征空间里,我们有待查询的抓点$t$和待查询的空间占用点$p$,我们通过对网格进行双线性插值得到对应的特征$\psi_t$和$\psi_p$,然后各自训练了一个网络去预测对应的数据。即$f_{a}(t,\psi_t)=(q,r,w)$和$f_b(p,\psi_p)=b\in[0,1]$。

​ 因为我们认为这个structured feature girds $C$是包含两个任务(重建模型和抓取创建)的综合信息(因为我们设计了两部分的loss都会回传到这里),所以后续的implicit function其实就是在做对应的回归和分类工作了。至于到底在哪里“implicit”了,最符合条件的其实也只有Occupancy probability的使用。因为说实话,我个人认为,对于Grasp(Affordance Implicit Functions)的分布是否连续,是否需要无限精度的函数去表征,并且这种方法的实用性存疑,只能说这样子做就是一个普通的二分类问题(预测Grasp Quality)、回归问题(预测Grasp的四元数、和夹爪的闭合宽度)。

Loss Functions

​ 损失函数的定义还是比较容易的,需要注意的是,因为在structured feature girds $C$这一部分是对我们的待查询点做双线性插值得到的,所以其实这个梯度是可以回传到前面的3D Conv和2D U-Nets的。
$$
L_A(\hat{g},g)=L_q(\hat{q},q)+\lambda(L_r(\hat{r},r)+L_w(\hat{w},w))
$$
​ 其中$\hat{q}$就是预测的抓取的成功率,而q就是成功/失败的GT标签。后面的r和w就是对四元数和宽度做回归。注意到$L_q$是交叉熵、$L_w$是2-范数。而$L_r$定义如下:
$$
L_r(\hat{r},r)=\min(L_{quat}(\hat{r},r),L_{quat}(\hat{r},r_{\pi})) \\
r_{\pi}=\pi-r
$$
​ 因为我们定义夹爪是parallel-jaw gripper,所以可以通过如上的定义使其拥有对称性。$L_G$就是Occupancy Network中的损失,总的网络损失定义如下:
$$
L=L_A+L_G
$$

总结

​ 这个工作把抓点预测和3D重建结合起来,确实比较有意思,而且最终创建出了Grasp的Implicit Function,就等于在空间任意点对应了一个夹爪的分数。是一个无限精度的heatmap,感觉还是不错的。但是ConvONET投影的方式确实让人的逻辑又绕了一层,并且最终训练完以后做inference居然是要在空间内均匀采样grid,然后对每个grid center做前向推导,最后还要做NMS取最高分。总的来说,感觉不太顺畅,不太符合大道至简的原则。

Author

Kami-code

Posted on

2022-01-26

Updated on

2022-02-19

Licensed under

Comments